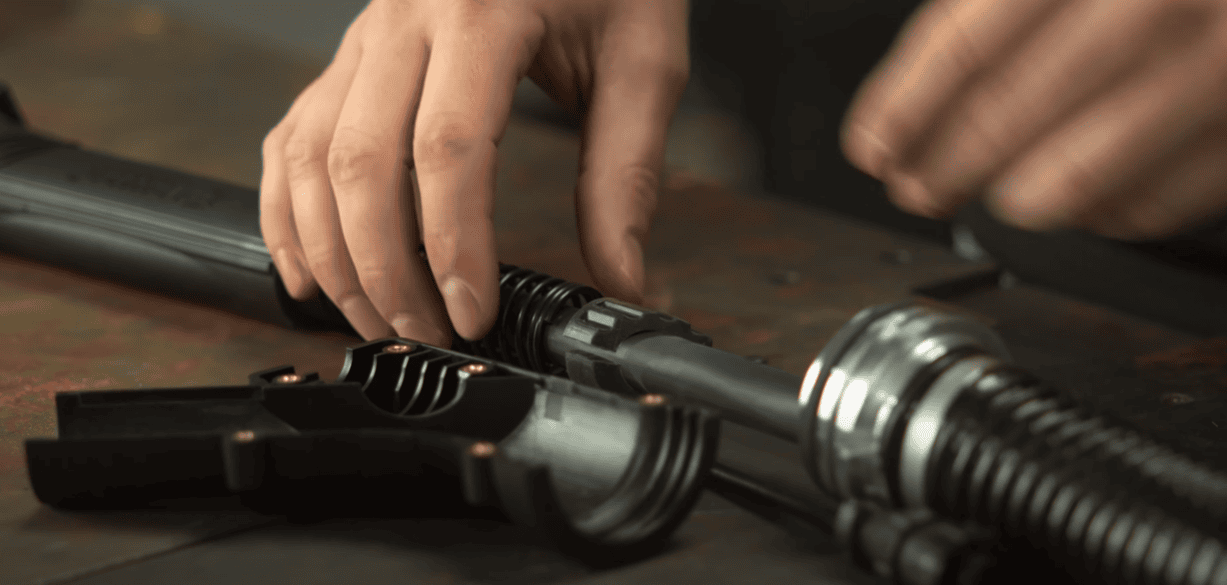
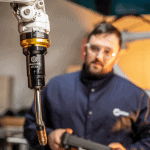
PRODUCT UPDATE | QT-CPL: Neck coupler redesigned
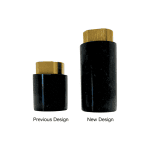
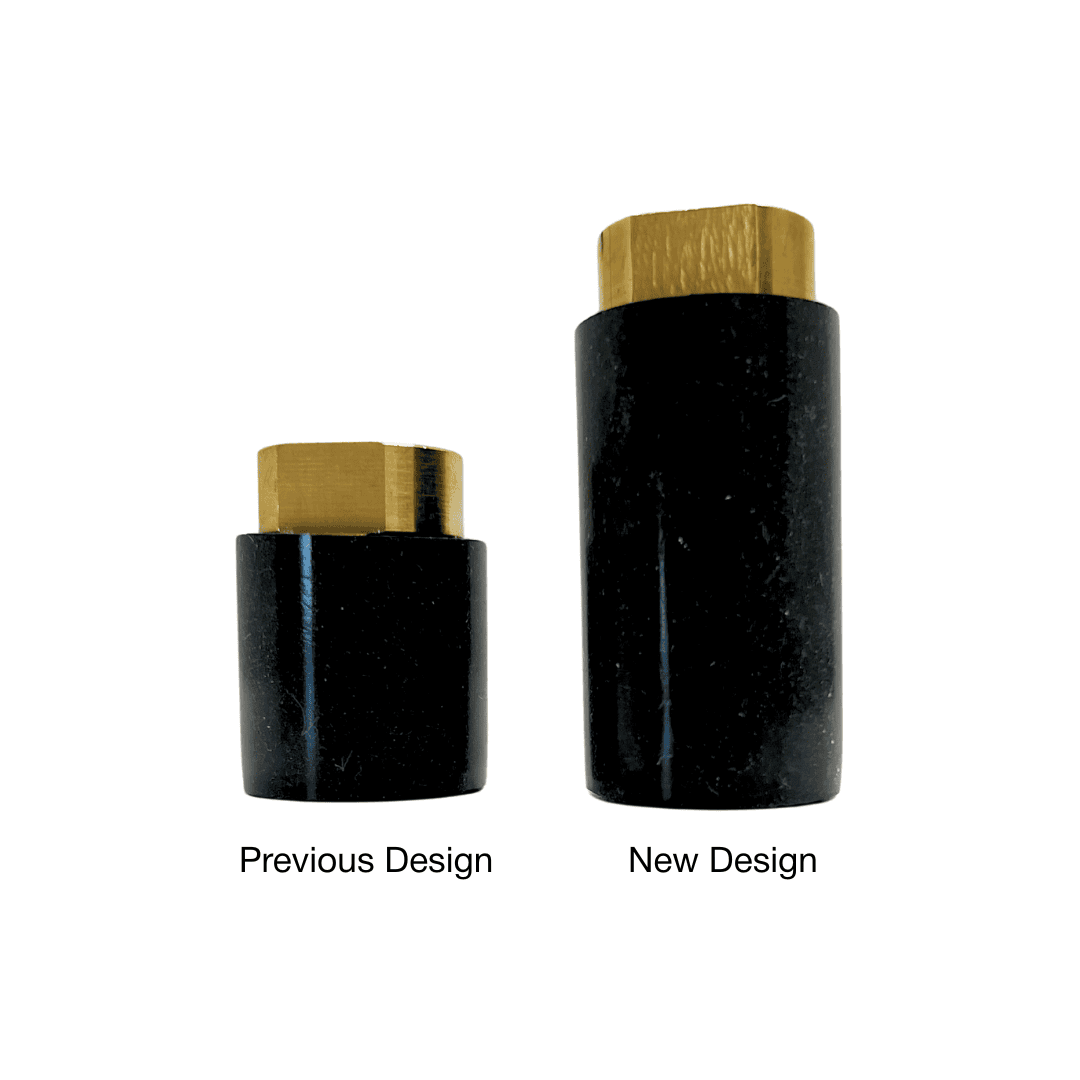
Effective December 8, 2025, Bernard introduced an updated design for the Q-Neck Coupler (QT-CPL). This design improvement features our Dual Taper Technology and an increase to the overall length to enhance thread engagement when joining two rotatable necks, resulting in a more secure and reliable connection.
- Previous Design (left): 1.50 inches (5.72 cm)
- New Design (right): 2.25 inches (3.81 cm)
The Q-Neck Coupler is designed to connect any two rotatable necks, offering greater flexibility and reducing the need for custom-order necks.
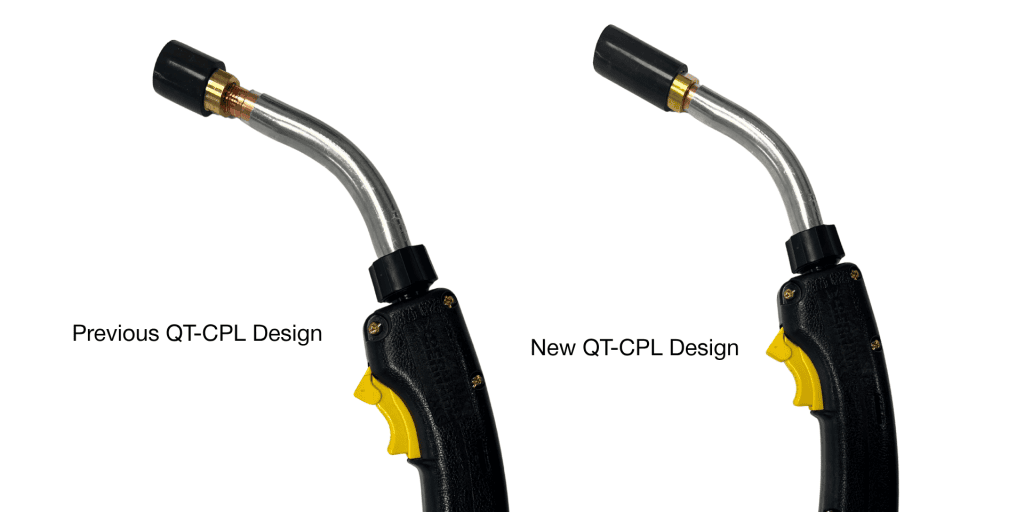
The images above show the QT-CPL installed without an insulator for demonstration purposes only. Please operate your welding gun safely and always use 4423R insulator behind the coupler before installing onto the neck.
To explore the full range of rotatable necks available, please refer to our [Neck Spec Sheet].
For questions or additional support, contact our Customer Service team at 855.644.9353 (MIGWELD) or email cs@bernardtregaskiss.com.
Product Simplification Announcement – Bernard BTB and S-Gun™
Product Simplification Announcement – Bernard BTB and S-Gun™
Continuing our efforts to simplify previously complex product configurations and pave the way for innovative new products, Bernard is taking the next step towards achieving these goals. Effective May 8, 2026, the following BTB and S-Gun configurations will be discontinued:
- All configurations with a C-Series handle (any trigger style, including Insight Limited)
- All configurations with a large O-Series handle (any trigger style)
We will continue to build BTB and S-Gun MIG guns with C-Series or large O-Series handles through this date.
Suggested Configuration Alternatives
To help with the transition from C-Series and large O-Series handles to current product offerings, please use the reference table below to guide your customers through replacement product selection.
| Current Handle Type | Model/Amperage | Suggested Handle Type |
| C-Series | Q30 Q40 Q50 Q60 | T-Series, large |
| S350 | O-Series, small | |
| S450 | T-Series, large | |
| O-Series, large | Q40 | B – Series |
| Q50 | T – Series, large | |
| Q60 | ||
| S450 |
Service Parts
Service parts will be available for a minimum time frame of 1 year (following our 1-Year Manufacturer’s Warranty for BTB and S-Gun MIG guns). Additional communication will be sent regarding the retirement of legacy service parts as well as information and support of backwards compatibility of new service parts on legacy products. We will provide advanced retirement notification of these service parts at a future time.
Insight Limited™ Triggers
Insight Limited™ triggers are an available option for MIG guns with a C-Series handle. These are specifically designed for use with power sources from Miller Electric that feature Insight Centerpoint™ welding information management systems. Please contact your local ITW Representative for additional assistance if your customer is currently using this technology with a C-Series handle.
S-Gun MIG Gun Configurator Updates
Effective immediately, our S-Gun product configurator will reflect the following changes:
- S250 and S350 models will only be configurable with Small O-Series Handles
- S450 models will only be configurable with Large T-Series Handles
These changes align with the simplification efforts outlined above and allow us to continue to deliver the best solutions to the field. Previously configured S250 and S350 models with a large T-Series handle as well as S450 models with a small O-series handle will still be available to order at this time.
We appreciate your support in promoting Bernard and Tregaskiss as a reliable, trusted solution for your customers. Please contact your local ITW Representative with any questions regarding these changes.
For questions or additional support, contact our Customer Service team at 855.644.9353 (MIGWELD) or email cs@bernardtregaskiss.com.
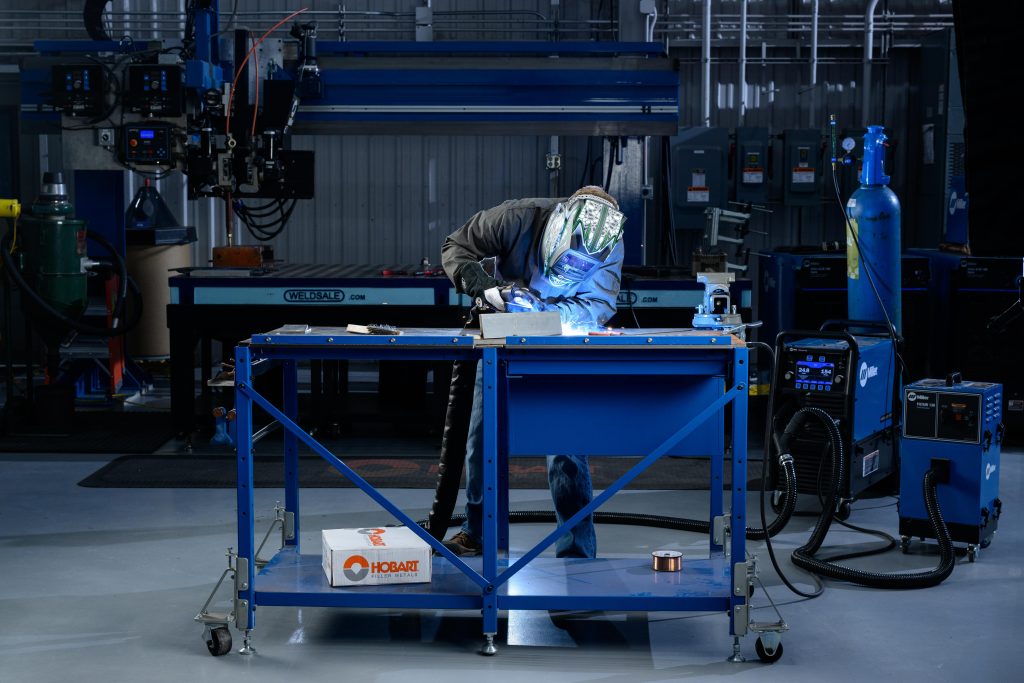
How the Bernard® IronPro™ Keeps Trains on Track at CSX Transportation
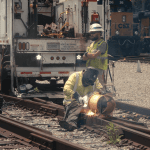
How the Bernard® IronPro™ Keeps Trains on Track at CSX Transportation
In Atlanta, Georgia, CSX Transportation keeps 1,848 trains running every day; a demanding job where every minute of downtime matters. Fast, reliable repairs are critical to keeping operations on track.
Before switching to the Bernard IronPro, CSX welders faced constant challenges. The intense heat of track repairs was tough on their old welding guns, which weren’t built to handle the job’s demands. Wire bird-nesting and other issues slowed them down, making it hard to keep up with repairs.
The IronPro changed that. Built for heavy-duty work like construction, shipbuilding, and equipment repair, it’s tough enough for the high-pressure environment of railroad track welding. With up to 450 amps of power, it delivers consistent, reliable welds even under the most extreme conditions.
Comfort is another reason welders love the IronPro. Its lightweight, slim neck design makes it easier to work in tight spaces on the tracks while reducing strain during long shifts. Less fatigue means the team can stay focused and get more done.
The gun’s versatility is a big plus too. Customizable neck lengths and other options make it easy to adapt to whatever challenges come up in on the tracks.
Since switching to the Bernard IronPro, CSX has cut downtime, sped up repairs, and kept their trains running on schedule. For the welders, it’s become a go-to tool they can depend on every day to get the job done right.
Learn more about the Bernard IronPro.
E-Z MIG Liner Guide

E-Z MIG Liner Guide
Mastering MIG welding liners: Types, challenges and solutions
Liners play a critical role in welding gun performance, directly impacting the quality and efficiency of the welding process. A smooth and consistent wire feed is what facilitates a stable arc and the ability to achieve uniformity of the weld. The choice of liner depends on factors such as the welding wire diameter, the type of material you’re welding and the specific MIG welding setup you’re using. There are several types of liners available, each with their advantages and disadvantages.

Rear-loading liners:
Rear-loading liners are installed through the back of the gun and are frequently used in the industry, so many welding operators are already familiar with and comfortable installing this type of liner. It is important that these liners are trimmed to a length compatible with cable length and consumable style to avoid feeding issues. Even if trimmed correctly, rear-loading liners can move from optimal position behind the contact tip as the cable grows and shrinks with twisting, potentially leading to the liner not being seated properly inside the retaining head.
Front-loading liners for handheld welding:
Bernard® front load liners are designed to address liner trim length errors, gaps along the wire-feed path and erratic wire feeding. They lock and concentrically align to both the contact tip and the power pin, and the lack of measuring guarantees error-proof liner replacement every time. These can only be used with the AccuLock® S consumables system.
Front-loading liners for automation:
QUICK LOAD® liners require less than half the time and effort to replace compared to rear load liners. After initial installation, QUICK LOAD liners minimize downtime by eliminating the trouble of maneuvering around tooling or transferring systems to remove the MIG gun from the wire feeder. It also allows for liner changeover from a safe zone outside the work cell during routine pauses in production.
Polymer liners for aluminum:
MIG welding guns for aluminum typically use polymer liners because they provide a smooth, low-friction path for the soft aluminum wire, reducing feeding issues. However, these liners are more delicate and wear out faster, making them less durable for heavy-duty applications.
Choosing the right liner is an important detail and can be the difference between costly interruptions and efficient welding performance.

MIG welder liner challenges that impact performance
While welding liners can arguably be seen as one of the more important components to a welding setup, they’re commonly seen as the hardest consumable to troubleshoot. Changing a liner requires turning off equipment, sometimes disconnecting the gun, and removing the liner — steps that lead to significant downtime. As a result, welders often replace nozzles, tips or diffusers first because they’re easier to access. That can temporarily mask liner-related problems but doesn’t solve them long-term. The most common problems associated with liners include:
Birdnesting:
Various characteristics of a liner can contribute to birdnesting, making it a delicate balance to strike. Excessive debris inside the liner can also restrict movement, causing inconsistent feeding. In cases of debris buildup, it is sometimes possible to restore functionality by removing the wire and purging the liner with compressed air without detaching it from the cable assembly.
The length and inside diameter of a liner can also impact how a wire travels through it. A liner that’s too short creates gaps, and one that’s too long compresses the wire path. Similarly, a liner that has an inside diameter too large for the wire in use may not adequately support the wire as it travels through the liner. One that is too tight increases friction and resistance. All of those discrepancies open the door for the wire to become tangled and unmanageable. Ultimately, not only does it take time to fix the wire (and potentially change the liner), but the wasted wire and downtime can drive up operational costs.
Poor wire feeding:
Erratic or irregular wire feeding may occur simply as a result of localized wear. When wear is evident, liner replacement is typically required to ensure consistent wire delivery and maintain welding performance.
Installation and trim length errors, which includes trimming the liner too short or having a liner that is too long, especially with rear load liners, can cause wire feed issues.
Kinks or bends in the cable:
Handheld welding typically involves longer power cables, which increases friction and makes wire feeding more difficult. Coiled or twisted cables further exacerbate these issues.

Innovative liner design helps overcome common welding challenges
To help alleviate common welding liner issues, E-Z Feed™ liners were engineered to reduce friction, reinforce rigidity and broaden compatibility in one solution. They’re available as rear-load, front-load and QUICK LOAD options, which are designed for automated setups, to help tackle any welding setup. The E-Z Feed liner stands out for several reasons:
Superior wire feeding:
It’s especially effective with softer, hard-to-feed wires like cored wire and aluminum, as well as common solid wires. Its design minimizes friction and supports smoother, more consistent wire delivery.
Corrosion-resistant coating:
This coating reduces friction, protects against corrosion and extends liner life.
Enhanced coil profile:
Reinforces rigidity and wire support, further improving wire feed reliability.
Versatility:
Initially engineered to solve problems related to cored wire, E-Z Feed liners have proven effective across all wire types, including aluminum and stainless steel.
Improved value:
The durability and performance reduce downtime and consumable replacements, resulting in long-term savings.
E-Z Feed liners are backward compatible with existing Bernard guns, and installation method is the same as a similar rear load or front load liner, making upgrades straightforward. Because of their performance benefits, E-Z Feed liners are now included as standard with every Bernard BTB MIG gun.
For MIG welding, the right liner can be a true performance driver. Liners may seem like a small component, but their impact on wire feed consistency, arc stability and overall welding performance is significant. Optimized for versatility, E-Z Feed liners help welders gain consistency and confidence across a wide range of job types and conditions. Choosing an innovative solution like this helps mitigate common frustrations and keep productivity moving forward.
Want to optimize your tools?
Check out the E-Z Feed Liner Page to see compatibility.
Vactor’s Formula for Better Welding

Vactor’s Formula for Better Welding
Building vacuum trucks that keep cities running is no small task.
For Vactor Manufacturing, a leader in sewer cleaning and vacuum excavation equipment, every weld matters. These trucks face demanding environments, so durability and precision during production are critical.To meet the demands of heavy-duty welding, Vactor relies on Bernard® BTB MIG Guns and AccuLock™ consumables. This combination helps them:
- Maintain uptime with quick-change liners and long-lasting contact tips
- Improve weld quality for large steel components
- Simplify maintenance and reduce downtime
These solutions keep Vactor’s production moving and their trucks ready for the toughest jobs.

Want to optimize your tools?
Check out the BTB MIG Gun Configurator to configure a gun that works with your operation, so you can weld it right the first time.
Learn More about Vactor Manufacturing
Vactor Manufacturing, based in Streator, Illinois, is a leading provider of sewer cleaning and vacuum excavation equipment. With over 50 years of expertise, Vactor has pioneered innovations like the first combination sewer cleaner and continues to deliver durable, reliable machines that help communities maintain critical infrastructure safely and efficiently.
Right-the-First-Time Welding
Right-the-First-Time Welding
Fixing defects demands careful planning and expert execution
Welding repairs often involve higher
stakes than original fabrication. The
pressure is greater, the conditions
are more challenging, and the consequences of
failure are more severe. Once a critical weld is
compromised, the risks increase significantly:
What was critical becomes supercritical, the
margin for error narrows, and the cost of
failure multiplies. A failure in a newly fabricated
pressure vessel might be inconvenient, but a
failure in a repaired pressure vessel already in
service could be catastrophic…
Read the full article here.
Want to optimize your tools?
Check out the BTB MIG Gun Configurator to configure a gun that works with your operation, so you can weld it right the first time.
About the Author
Mostafa Hanafy
Mostafa Hanafy (mostafa.hanafy@bernardtregaskiss.com) is director of strategic marketing and product management at Bernard and Tregaskiss.
Automation for Better Welding
Automation for Better Welding
Technology enhancements optimize and advance automated welding performance.

The skilled labor shortage is not a new concern within the welding industry. While efforts are being made to attract new talent, those who join still need ample time to learn and truly refine their skills. Because of shortages and the lengthy on-ramps for newer welders, some operations may still be behind in meeting the demands of their business and struggling with weld quality and consistency issues…
Read the full article here.
Want to optimize your operations?
Check out the Atlas Data Sheet to see how it can improve uptime and minimize training efforts.
To learn more about upgrading your automation efforts visit the Atlas Robotic ThruArm MIG Torch Product Page here.
About the Author
Brad Whipple
Brad Whipple is a senior engineer for Tregaskiss. Email brad.whipple@bernardtregaskiss.com
Right Equipment, Better Ergonomics

Right Equipment, Better Ergonomics
A welder that can keep comfortable doing the job is likely to avoid unnecessary strains
It’s no surprise that as welders reach their 30s, they are not as flexible and limber as they were when they were just starting out in the metal fabricating business. What is surprising is that most companies don’t take that into account, putting these valuable craftsmen at risk of possibly developing sprains and strains that make them unable to work.
These types of ergonomic injuries—pain and damage to muscles, tendons, and ligaments caused by awkward positions and repetitive activities—are real factors in the manufacturing industry. According to the Bureau of Labor Statistics….
Read the full article here.
At Bernard Welding, we place a strong emphasis on welder comfort and ergonomics in every product we release.
By configuring your own MIG gun, you can customize it to fit the way you work—rather than adjusting the way you work to fit the tool. Use our configurator to design a Bernard MIG gun that helps your welders stay comfortable, weld longer, and work more productively; so they can keep delivering quality parts for years to come.
About the Author

Dan Davis
Editor-in-Chief
2135 Point Blvd.
Elgin, IL 60123
815-227-8281
Dan Davis is editor-in-chief of The Fabricator, the industry’s most widely circulated metal fabricating magazine, and its sister publications, The Tube & Pipe Journal and The Welder. He has been with the publications since April 2002.
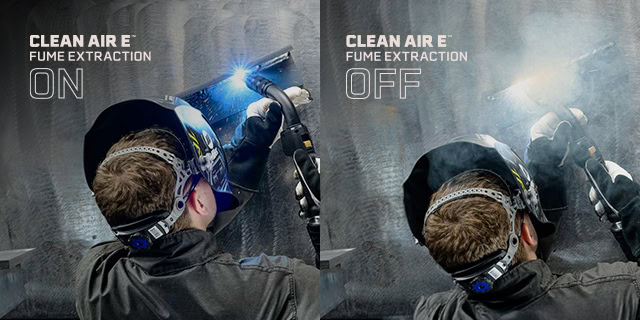
A Big Win for Clean Air E – Bernard Takes Home a Pro Tool Innovation Award!
A Big Win for Clean Air E – Bernard Takes Home a Pro Tool Innovation Award!
Bernard® Clean Air™ E fume extraction gun has been recognized with a 2025 Pro Tool Innovation Award in the Automotive and Metalworking category, under Welding Guns.
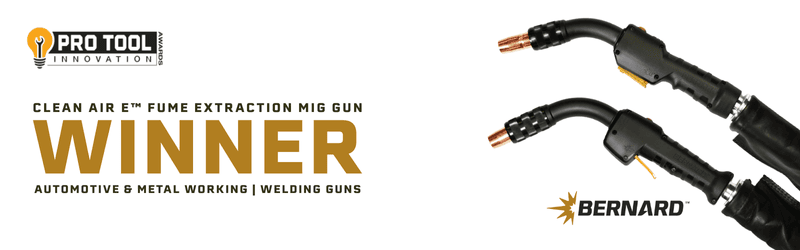
The Pro Tool Innovation Awards are judged by a panel of contractors, trade professionals, and tool experts who evaluate products based on innovation, performance, and value. These awards highlight tools that solve real jobsite challenges and help professionals work more efficiently. Winning products are selected for their ability to improve workflow, boost productivity, and offer new opportunities in the field.
The Automotive and Metalworking category includes tools built for those working with metal or vehicles. It covers everything from welding guns and grinders to inspection tools and accessories. Clean Air E stood out for its ability to deliver cleaner air, better ergonomics, and long-term durability. These key benefits are all critical for demanding industrial environments.
What Makes Clean Air E Different
- Fume Control at the Source – Efficient Extraction
Clean Air E captures up to 95% of weld fumes directly at the arc. This helps protect welders, improves visibility, and supports compliance with health and safety standards. - Comfort That Lasts – Enhanced Ergonomics.
Designed with welders in mind, it features a balanced build, optimized handle, and ball swivel for better control and reduced fatigue during long shifts. - Built to Handle Tough Jobs – Engineered for Endurance.
Its rugged design and long-life consumables reduce downtime and maintenance, keeping operations running smoothly. - Improved Visibility for Better Welds
The gun is engineered to minimize arc obstructions, giving welders a clearer view of the weld puddle for more precise and consistent results.
This award is a reflection of the hard work and collaboration across our team. From product development to launch, everyone played a role in making Clean Air E a success.
You can view the full list of winners at protoolinnovationawards.com.
Interested in the Bernard Clean Air E?
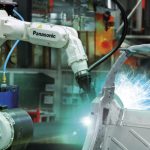
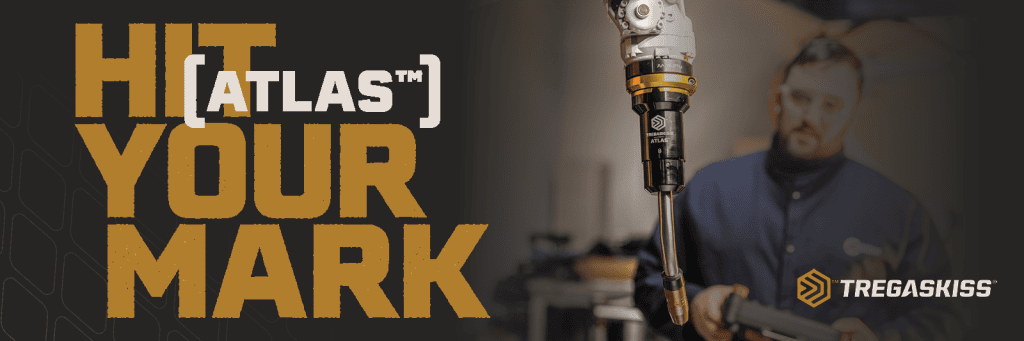
Tregaskiss Redefines Performance With New Atlas™ Robotic ThruArm Air-Cooled MIG Torch
Tregaskiss Redefines Performance With New Atlas™ Robotic ThruArm Air-Cooled MIG Torch
Engineered for precision, built for uptime and designed to hit your mark
BEECHER, Ill./WINDSOR, Ontario (September 4, 2025) — Tregaskiss, a leading innovator in robotic welding solutions, introduces the Atlas™ robotic MIG welding torch — a next-generation, air-cooled ThruArm GMAW torch engineered to deliver unmatched efficiency, repeatable precision and simplified maintenance. Constructed to endure the demands of industrial environments, Atlas helps operators reduce downtime by up to 87% while ensuring consistent, high-quality welds.
Atlas raises the bar in robotic MIG welding and delivers a breakthrough in uptime and weld quality. Its robust construction and streamlined cable routing minimize unplanned downtime and maintenance, while producing high-quality welds across demanding applications.
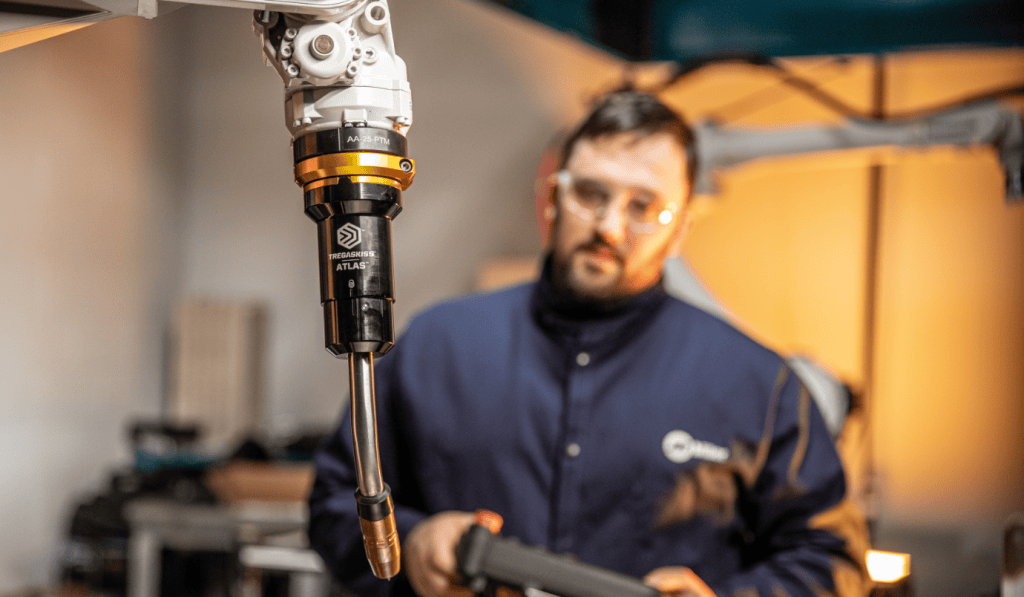
“We took over three decades of experience and know-how in robotic MIG welding and unleashed our engineers to develop this revolutionary and innovative robotic A/C thru-arm torch,” said Andrew Marchand, director of engineering. “As a result, Atlas sets a new standard in the industry for installation time, TCP repeatability and ease of maintenance.”
Ideal for operations focused on automotive, heavy equipment and general manufacturing, Atlas sets a new standard with its toughness and accuracy. Key features and benefits include:
- Consistent tool center point (TCP): The keyed stainless steel neck construction provides superior rigidity, long-lasting positional features and increased neck-to-neck repeatability. Additionally, the isolated, separate mechanical and electrical functions, combined with a direct neck-to-cable connection, reduce performance issues.
- Maximized uptime: Tool-less cable change, predictive maintenance indicators and quick-change components reduce unplanned downtime and total service time.
- Designed for durability: Built tough to withstand harsh industrial environments, Atlas protects key components from debris and spatter and extends torch life.
- Streamlined maintenance: Intuitive features like captured fasteners, inspection windows and install confirmation indicators make servicing fast and foolproof.
- Engineered efficiency: The modular, optimized design drives better performance and simplifies training and maintenance.
The Atlas torch will officially debut at FABTECH 2025 this September, where attendees can experience its performance firsthand. Visit booth B20027 from September 8-11 to learn more about Atlas and how it can transform your robotic welding operations.
If you can’t attend the show, visit https://www.bernardtregaskiss.com/product/atlas/ for additional details.
About Tregaskiss
Tregaskiss is a trusted manufacturer of high-quality robotic MIG welding torches and consumables, focused on delivering performance, reliability, and efficiency in automated welding applications. Based in Windsor, Ontario, Tregaskiss designs innovative solutions that offer durability for industrial applications, support system uptime, and reduce maintenance needs in demanding environments. Tregaskiss is a proud brand of Illinois Tool Works Inc. (NYSE: ITW). For more information, visit BernardTregaskiss.com, call 1-855-MIGWELD (1-855-644-9353), or email CS@itwmig.com.
Contact:
Lauren Smith, Hiebing for Bernard/Tregaskiss
phone: +1 6082684408
Contact: Lauren Smith, Hiebing for Bernard/Tregaskiss phone: +1 6082684408 lsmith@hiebing.com
The Hidden Cost of Cutting Corners in Robotic Welding Equipment
The Hidden Cost of Cutting Corners in Robotic Welding Equipment
The global robotic welding market is heating up. This growth is being fueled by a critical mix of factors: a shortage of skilled welders, the rising demand for manufacturing efficiency, and an industry-wide push toward automation across sectors like automotive, aerospace, construction equipment, and general fabrication.
At the center of many robotic welding cells is MIG welding, prized for its speed, adaptability, and suitability for automation. But what often gets overlooked in the race toward automation is this: your system is only as good as the equipment you put into it.
And cutting corners on that equipment? It comes with a price.
Downtime Is Expensive and Often Avoidable
Cheap or underperforming components can quickly turn a high-output robotic welding cell into a bottleneck. From unreliable torches to inconsistent consumables, even minor issues can lead to misaligned welds, excessive spatter, or system stoppages that eat into productivity. Worse yet, these problems are rarely one-offs. Poor-quality components often result in frequent rework, more operator intervention, and additional maintenance all of which erode your ROI over time.
Repeatability and Reliability Shouldn’t Be Optional
Robotic systems rely on repeatable precision. Every weld pass, programmed path and every contact point needs to perform the same, shift after shift. That’s nearly impossible to achieve if your equipment isn’t built to hold tolerances or endure tough environments.
Newer torch designs, like the Tregaskiss® ATLAS™ Robotic ThruArm MIG Torch, have been engineered to deliver consistent, repeatable performance in even the most demanding applications. While not the only solution, products like this are helping manufacturers cut down on downtime and reduce the need for frequent reprogramming or adjustments.
Skilled Labor Is Scarce – Simplicity Matters
With fewer experienced welders and technicians entering the workforce, maintenance routines need to be simplified and, ideally, predictable. Equipment that requires constant tweaking or is difficult to service adds stress and inefficiency to an already stretched workforce.
Modern robotic welding gear is starting to address this. Atlas™ addresses the pain behind predictive maintenance and visual inspection features to take the guesswork out of service intervals. Compatibility with the Tregaskiss Torch Maintenance Module, for instance, allows teams time for maintenance before failure occurs – not after. That kind of visibility leads to fewer unexpected stoppages, fewer errors during maintenance, and more time spent where it counts: welding parts.
The Real Cost Isn’t Just Dollars – It’s Lost Opportunity
In a fast-moving manufacturing environment, the true cost of cutting corners isn’t just found on a balance sheet. It’s in jobs that don’t ship on time. The customers who look elsewhere. The employees are frustrated by constant issues.
Choosing the right robotic welding equipment from the start, even if it comes with a slightly higher price tag is an investment in long-term stability, performance, and productivity. It’s about building a system that works with your team, not against it.

Quality Pays for Itself
As robotic welding continues to expand across industries, the companies that will lead the charge are those who recognize that good equipment isn’t a luxury, it’s a necessity. Whether it’s a rugged torch that stands up to tough environments, or consumables designed for long life and precision, choosing quality upfront prevents pain later.
And in today’s climate of labor shortages, rising expectations, and constant pressure to do more with less, that choice might just be the difference between staying competitive, or falling behind.
Learn more about how Atlas can help save your operation time and money.
GET STARTED.
Product Guide: Changing the Neck on Your Tregaskiss Atlas™ Torch
Product Guide: Changing the Neck on Your Tregaskiss Atlas™ Torch

In this video, we walk you through the simple process of changing the neck on your Atlas™ torch. Whether you’re upgrading, replacing a worn-out part this guide will help you do it safely and efficiently.
Steps Covered in This Video:
Removing the neck body cover
Loosening the SHCS bolts with a 4mm Allen wrench
Cutting the weld wire and removing the old neck
Aligning and installing the new neck
Torquing the SHCS to 50 in-lbs
Locking the neck cover into place
Pro Tip: If the neck cover doesn’t lock into place, double-check that the SHCS are fully torqued.
Product Guide: Reinstalling a LSR+ Unicable on Your Tregaskiss Atlas™ Torch
Product Guide: Reinstalling a LSR+ Unicable on Your Tregaskiss Atlas™ Torch

In this video, we walk you through the full process of Reinstalling a new LSR+ Unicable on your Tregaskiss Atlas™ torch. Whether you’re setting up a new system or replacing an old cable, this guide will help you get the job done right.
Steps Covered in This Video:
Removing the consumables and liner Taking off the connector housing cover
Opening the cam levers Removing the old cable from the robot wrist Installing the new LSR+ Unicable and power pin Inserting the liner (QUICK LOAD or rear load)
Securing the cable and closing the cam levers
Reinstalling the connector housing cover and consumables
Tip: Position the robot wrist downward at a 45° angle for easier installation.
Product Guide: Removing the Cable on Your Tregaskiss Atlas™ Torch
Product Guide: Removing the Cable on Your Tregaskiss Atlas™ Torch

In this video, we walk you through the complete process of changing the LSR+ Unicable on your Tregaskiss Atlas™ torch. Whether you’re upgrading, replacing a worn cable, or performing routine maintenance, this guide will help you do it safely and efficiently.
Steps Covered in This Video:
Removing the consumables and liner Taking off the connector housing cover
Opening the cam levers Removing the old cable from the robot wrist Installing the new LSR+ Unicable and power pin Inserting the liner (QUICK LOAD or rear load)
Securing the cable and closing the cam levers
Reinstalling the connector housing cover and consumables
Tip: Position the robot wrist downward at a 45° angle for easier installation.
Product Guide: Installing the Tregaskiss Atlas™ Torch
Product Guide: Installing the Tregaskiss Atlas™ Torch

In this video, we guide you through the complete installation process for the Tregaskiss Atlas™ torch. From mounting the robot adapter to securing the V-Band Clamp, this step-by-step tutorial ensures a proper and secure setup for your welding system.
Steps Covered in This Video:
Positioning the robot wrist and top axis Installing the robot adapter and insulating disc
Torquing the SHCS bolts to 45 in-lbs
Feeding the fully configured gun assembly through the robot wrist Installing the power pin into the wire feeder
Aligning and securing the connector housing with the V-Band Clamp (torque to 75 in-lbs)
Managing the M12 cordset if not using the Torch Maintenance Module
Tip: For proper alignment, position the robot wrist and top axis 180° parallel before starting the installation.
Visit bernardtregaskiss.com/product/atlas to learn more.
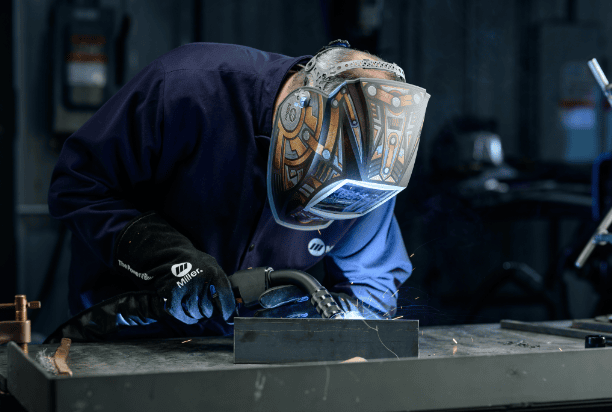
Improved Flux-Cored Welding for Heavy-Duty Field Use
Improved Flux-Cored Welding for Heavy-Duty Field Use
Understanding operator challenges is what drives innovation in the welding industry. For some, that challenge is outdoor welding, where using shielding gas is not optimal. In these extreme conditions, traditional MIG welding won’t necessarily work. Turning to a different process, such as self-shielded flux-cored welding (FCAW-S), allows for more effective welding in the field. When welding in harsh environments, operators require durable, rugged equipment that can withstand the elements and the nature of the work.
Operators utilizing self-shielded flux-cored welding demand a high level of flexibility and reliability in their equipment, which is why Bernard optimized the IronPro™ self-shielded FCAW gun to be extremely durable when welding in heavy-duty field operations.
Features that enhance flux-cored welding for heavy-duty applications
Operators need a gun that stays cooler in the hand and is lightweight, portable and reliable — handling the rigor of the toughest worksites while improving operator comfort. To improve usability and the overall user experience, IronPro introduces several enhancements to meet those needs and help overcome technical and operational challenges when out in the field.
Specifically, the IronPro 350 has a 350-amp rated output with a 60% duty cycle, making it ideal for operators working in construction, shipbuilding and heavy manufacturing. The design was further updated to include:
- Interchangeable neck options: The IronPro 350 features two rotatable neck options — one that’s 7 inches with a 60-degree bend radius and one that’s 12 inches with a 45-degree bend radius. These allow operators to ergonomically access even the most challenging, out-of-position welds. The neck can be rotated for a trigger-on-top approach, allowing for even more dexterity and customization at the joint.
- Sealed trigger: The trigger is designed to keep the area slag- and spatter-free, reducing maintenance downtime. Being non-metallic, it absorbs less heat, and it’s made with a sealed switch that helps keep out dust and dirt, leading to a longer lifespan.
- Lighter cable: The weight and bulk of higher amperage gun cables can lead to fatigue over extended periods of time. The cable for the 350 is lighter, making it more mobile and user-friendly for a welder on a day-to-day basis.
Incorporating all the updated design features mentioned above, IronPro 450 is also available for higher amperage applications, supporting up to 3/32″ wire size. IronPro 450 has a 450-amp-rated output with a 60% duty cycle.

Additional ways to improve field performance
To keep operators welding in tight positions longer, using AccuLock™ S consumables will increase contact tip life, resulting in fewer tip changes and increased overall performance with fewer points of failure. To further improve field performance, the cable liner incorporates Bernard® E-Z Feed™ technology, ensuring a reliable and smooth feed, minimizing chatter and poor arc characteristics. The superior feeding performance, paired with high-quality consumables, leads to more consistent welds, minimizing rework.
The tip insulator was redesigned to be more durable, withstanding more aggressive weld parameters to keep the electricity from short-circuiting between the tip and neck. Additionally, the insulator transitioned from being a slip-on to a thread-on, allowing it to stay in place better. These design improvements help minimize bridging from spatter and improve operator safety by ensuring the contact tip remains isolated to allow current to flow correctly through the wire to the weld puddle. Operators can choose between composite tip insulators, for increased joint access, or armored tip insulators, which are well-suited for higher amperage applications. These options allow operators to better customize their IronPro to suit the needs of their applications.

When welding heavy-duty applications in the field, operators need power, durability and consistency. The IronPro 350 offers improvements that exceed those demands. Welders can elevate their welding performance — and experience the productivity and quality benefits self-shielded flux-cored welding offers.
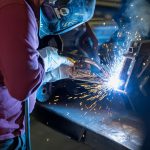
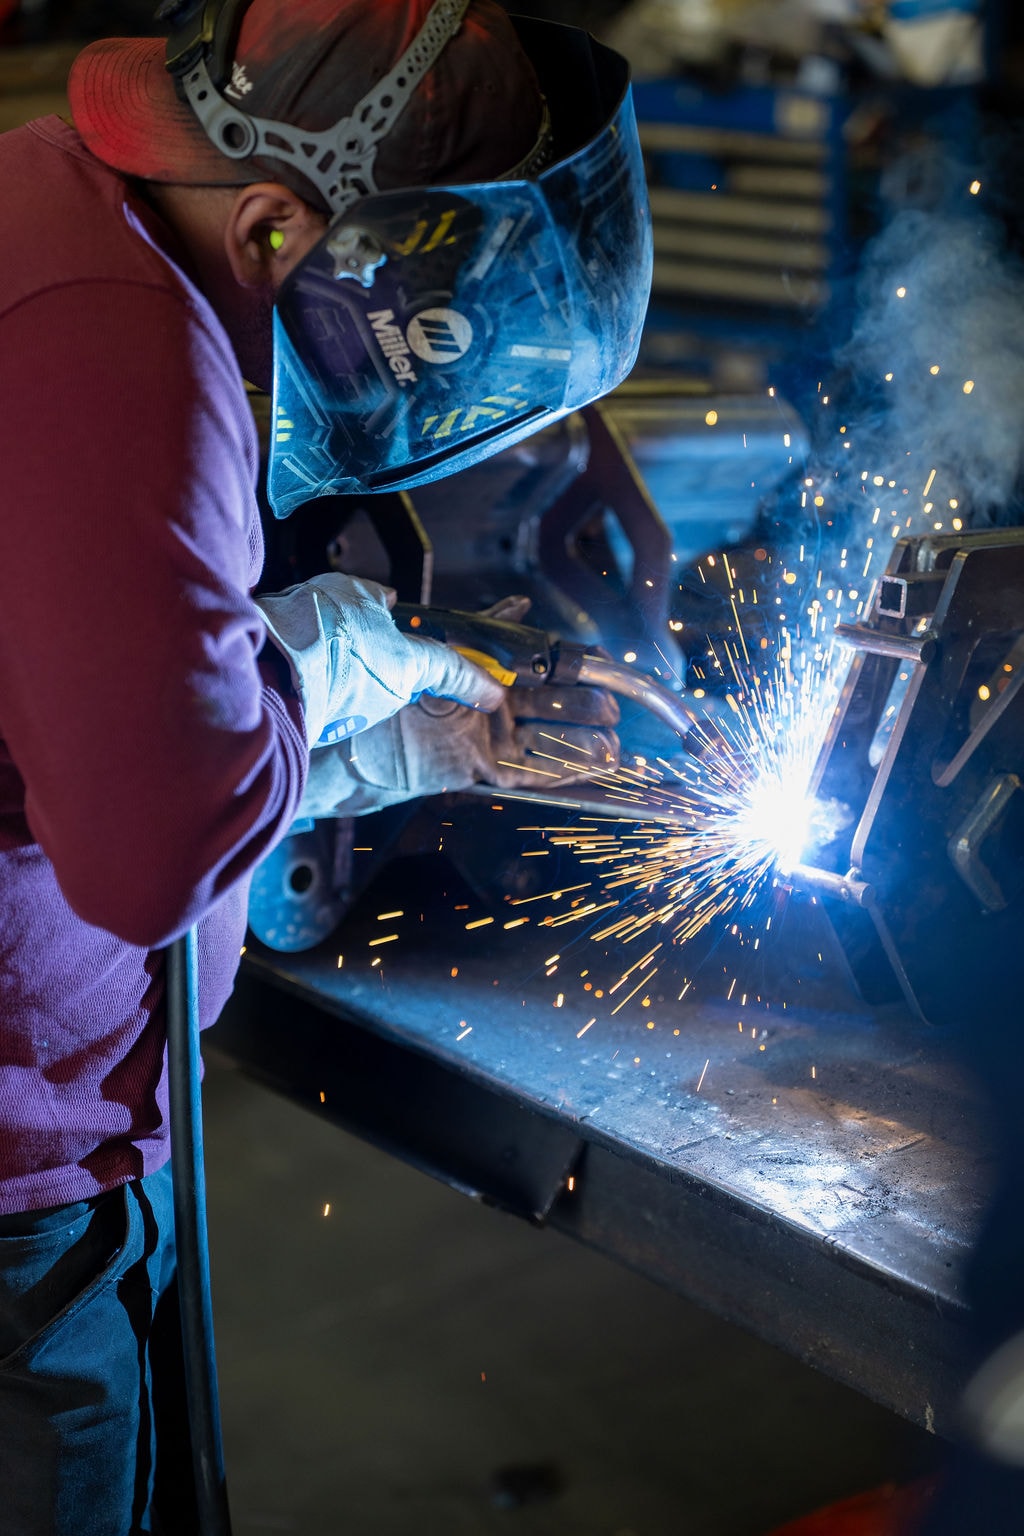
4 Reasons Genuine Consumables Lead to Better MIG Welds

4 Reasons Genuine Consumables Lead to Better MIG Welds
Welders must be able to rely on every aspect of their equipment, and consumables are an integral component of a high-quality weld. When you notice an uptick in downtime and consumables consumption, it’s time to take a deeper look at what the culprit could be. An easy place to start is by looking at the quality of the consumables you’re using. Lower-quality consumables can lead to major expenses in the long run — as seen in lost production, weld rework and the cost of constant replacements.
Original equipment manufacturer (OEM) consumables are the right choice for improved operations and consistent, high-quality welds. Below are four reasons you should consider investing in genuine consumables over lower-quality options.

- Consumable quality affects your performance
Even the best MIG guns or the most highly trained operators cannot offset the impact of poorly made consumables on performance. OEM consumables are manufactured using high-quality materials, which helps deliver the arc stability needed to create smooth, even welds with minimal defects. In addition to helping improve weld integrity and facilitating more durable weld joints, genuine consumables also help prevent excessive spatter and minimize post-weld cleanup.
Because OEM consumables are manufactured for reliability, they have consistent diameters and surface conditions that ensure smoother feeding through the gun. By contrast, non-genuine consumables are often made from low-quality materials and may not consistently meet key manufacturing specifications.
2. OEM consumables are expertly designed to be reliable
Genuine consumables are backed by research, technology and expertise, having been produced to ensure the material composition and mechanical properties are consistent and reliable. Keeping those details at the forefront makes for stable arcs, high-quality welds, fewer points of failure and simplified maintenance. Their ease of use can even help to reduce welder training times and shorten your troubleshooting list if problems do arise.

Copycat manufacturers are also less likely to submit their consumables to the rigorous testing and quality assurance processes that OEMs follow.
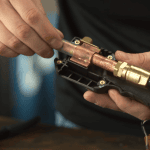
AccuLock ™ consumables have been designed to flawlessly integrate into Bernard® semi-automatic and Tregaskiss® fixed automatic and robotic MIG welding guns and to address welders’ most common pain points.
For semi-automatic MIG welding applications, the AccuLock™ S consumables system paired with front load E-Z Feed™ liners reduces liner trim length errors and erratic wire feeding while simultaneously increasing contact tip life. The front load liners are locked and concentrically aligned to both the contact tip and power pin. This eliminates misalignment and provides a flawless wire feed path, ensuring uninterrupted delivery of the wire to the weld puddle. As a result, operators have fewer burnbacks, bird nests and erratic arcs.
The AccuLock R consumables system is available for robotic or fixed automatic MIG welding applications. With these consumables, operators have the opportunity to realize significant improvements, like increasing contact tip life span and decreasing issues with contact tip cross-threading.
For operations constantly managing complex or costly consumables inventories, AccuLock S and AccuLock R consumables systems share a common contact tip — making for simplified part inventory across mixed fleets of semi-automatic and automated welding applications. Operations who are looking to get more life out of their consumables but aren’t using Bernard or Tregaskiss guns can purchase the conversion series consumables to still experience the benefits of a high-quality system.
3. Using low-quality products limits your manufacturer’s ability to help
A good OEM is invested not only in the performance of its products but also in the overall user experience, which extends to customer service. Reputable OEMs usually have expert technical support teams that help with troubleshooting and provide solutions if something goes wrong. They can also share product tips and offer advice, like how to make your MIG gun consumables last longer.

However, if you’re using nongenuine consumables and parts, technical support teams are unable to offer such assistance. Often, if an issue arises involving lower-quality parts, it will be essential to order genuine parts and wait for them to arrive to see if the issue still occurs before the OEM team can offer support. Using genuine parts from the get-go means you can get expert advice right away — or avoid issues altogether.
4. OEM products can have a longer life
Because OEMs are making greater investments in materials, design and testing, that means OEM consumables usually cost more than low-quality consumables. But, as the saying goes, you get what you pay for. Consumables are probably not your biggest cost — labor is. So any money you save by using cheaply made consumables could be offset by the extra labor required to frequently change tips, troubleshoot equipment failure or rework a faulty weld. Those looking for superior performance and longevity find that OEM options can equate to more arc-on time — and more products out the door.
AccuLock contact tips are designed so that 60% of the tip is buried within the diffuser for less exposure to the heat of the arc and more cooling from shielding gas. This gives the tip a life that can be two to three times longer than other tips.
All told, because genuine consumables are designed specifically for your MIG welding gun, they can last longer, be more reliable and deliver higher-quality welds — ultimately enhancing the operator experience and your welding operation’s bottom line.
DISCONTINUED PART | Extended length Elliptical Contact Tip, 1598L
Discontinued Part | Extended length Elliptical Contact Tip, 1598L
Discontinued Part | Extended length Elliptical Contact Tip, 1598L
Effective November 10, 2025, extended length Elliptical contact tip 1598L will be discontinued due to low sales. This contact tip was compatible with wire size 0.052” (1.4 mm) and was 2.25” (57.15 mm) in length.
There is no direct replacement for this contact tip due to the extended length of 1598L. However, Elliptical tip 1598 can be substituted as this is compatible for 0.052” (1.4 mm) wire. Contact tip 1598 is 2.00” (50.8 mm) in length.
For questions or additional support, contact our Customer Service team at 855.644.9353 (MIGWELD) or email cs@bernardtregaskiss.com.
Introducing The Bernard® Clean Air E™

Introducing The Bernard® Clean Air E™
Welding professionals face daily challenges in keeping their work environment clean and safe. With strict weld fume regulations, effective fume control is more important than ever. The Bernard® Clean Air E™ fume extraction MIG gun helps by capturing welding fumes directly at the source without sacrificing performance.
Why Source Capture Matters
Capturing weld fume as close to the point of generation as possible, also known as source capture, is one of the most effective ways to reduce exposure. Unlike general ventilation or ambient air systems that dilute fumes, source capture methods like fume extraction guns immediately remove hazardous particles, helping improve air quality for operators and surrounding workers.
The Clean Air E™ captures up to 95% of fume at the source. The gun is built with adjustable extraction control through interchangeable shroud lengths and a slider allowing operators to fine-tune suction levels without affecting shielding gas coverage. This balance is critical for maintaining weld quality while maximizing fume capture.
Key Benefits of the Clean Air E™
Efficient Extraction
By removing up to 95% of fumes directly at the arc, the Clean Air E™ helps reduce exposure risks and contributes to a cleaner workspace.
Enhanced Ergonomics
With a lightweight handle design, the Clean Air E™ allows you to weld longer without fatigue. The ball swivel at the rear of the handle makes maneuvering easier, even in difficult positions.
Engineered for Endurance
This fume gun is built to withstand the toughest working environments. Made from durable, tested materials, it features a robust and straightforward design for easy maintenance.
Designed for Demanding Applications
Ideal for high-amperage and high-deposition rate applications, the Clean Air E™ is well-suited for industries such as: Shipbuilding, Heavy equipment manufacturing, General fabrication and manufacturing
Ergonomic and Easy to Use
Unlike bulky ventilation systems, fume extraction guns like the Clean Air E™ seamlessly integrate into a welder’s workflow. With a lightweight, ergonomic design and a user-friendly adjustment slider on the guns handle, it operates much like a standard MIG gun while providing the added benefit of fume extraction.

Customizable
We know every welder has their own preference when it comes to welding style. That’s why we designed two trigger options—a button and a lever, plus an extended lever for added comfort. We also made the shrouds interchangeable, offering three lengths to optimize either weld visibility or fume extraction, depending on your application.
A Smarter Step Toward Safer Welding
No single solution eliminates all welding fume exposure, but using a fume extraction gun alongside a compatible extraction unit like the Miller® Filtair®215 can significantly improve a workplace environment. The Bernard® Clean Air E™ provides a practical, effective way to prioritize welder safety and performance.

It starts at the source™
For Immediate Release BEECHER, Ill./WINDSOR, Ontario (March 20, 2025) — Bernard announced the release of the new Clean Air E™ fume extraction MIG gun, the newest high-efficiency fume extraction gun in the brand’s lineup. Crafted for efficient extraction, enhanced ergonomics and engineered endurance, this gun sets a new standard in MIG welding fume capture technology. With an ongoing priority to ensure safer, cleaner work environments for operators coupled with heightened fume standards being implemented across the country, Bernard saw an opportunity to evolve the standard fume extraction gun to maximize its efficiency and usability. Bernard took customer and welder feedback and designed a product that would be the most impactful for welders in a next-generation fume extraction gun. The team applied that feedback throughout the research and development process until it resulted in the Clean Air E™, which offers solutions to common operator pain points, including: · Efficient extraction: The Clean Air E™ achieves up to 95% fume capture right at the source, which improves air quality in the workspace and reduces OSHA-related risks. · Enhanced ergonomics: The ergonomic design reduces strain and fatigue on welders, which allows them to focus on precision and quality for extended use. · Engineered for endurance: The Clean Air E™ features durable components and long-life consumables, which reduces downtime and maintenance costs, delivering a lower cost of total ownership. “When it comes to welding, operators seek the trifecta in their gun: ergonomics, extraction performance and ease of maintenance,” said Jerome Parker, product manager, Bernard. “The Clean Air E™ was designed alongside actual users to ensure we arrived at a solution that redefined traditional fume capture guns for the modern welder, enhancing both their operator experience and their weld environment.” On the gun itself, the Clean Air E™ offers enhanced features for easier and more efficient use: · Improved weld access: Three nozzle shroud lengths allow operators to balance fume capture with weld access and improved visibility of the weldment. · Instant flow adjustment: The new flow control slide on the back of the handle enables welders to easily reduce airflow by up to 10 cfm to help overcome porosity issues. · Upgraded handle comfort: Two handle styles are available to suit different grip styles and hand sizes, with internals contoured to enhance airflow and fume capture. The lever trigger can also be mounted on top for additional comfort. · Increased flexibility: A durable, lightweight aluminum ball swivel at the end of the handle provides 15 degrees of extra flex in any direction for additional improved ergonomics. · Maximized airflow: A new Y-connector offers contoured internals that maximize airflow, with a vacuum outlet that is compatible with any fume extraction unit. For a premium fume extraction pairing, operators have the option to connect the Clean Air E™ to the Miller® FILTAIR® 215. Learn more about how the Clean Air E™ can deliver safety, performance and comfort for welders at https://www.startsatthesource.com/ About Bernard Bernard, a leading manufacturer of premium semi-automatic MIG welding guns and consumables, is dedicated to enhancing welding productivity and performance. Headquartered in Beecher, Illinois, Bernard is known for innovative solutions that prioritize operator comfort, ease of maintenance, and exceptional durability. Bernard is a proud brand of Illinois Tool Works Inc. (NYSE: ITW). For more information, visit BernardTregaskiss.com, call 1-855-MIGWELD (1-855-644-9353), email CS@itwmig.com. Contact: Lauren Smith, Hiebing for Bernard/Tregaskiss phone: +1 6082684408 lsmith@hiebing.com Keep your Bernard® Clean Air E™ Fume Extraction MIG Gun performing at its best by replacing the Y-connector when needed. This quick guide walks you through the simple steps to ensure a secure fit and maintain optimal fume extraction efficiency. Watch now to keep your system running smoothly and your workspace cleaner. Instructions Separate connector halves. Push rear hose swivel forward to slide it out of the cavity. Slide the hose assembly forward and remove the remaining Y Connector half. Place the new rubber boot into the new Y Connector set. Position the cable assembly in the Y Connector channel, ensuring proper alignment with rubber boot. Pull the hose assembly back into the swivel cavity and ensure it is taut (no slack). Confirm the hose and cable assemblies are properly seated and secure. Align the Y Connector halves and reinstall screws. Find more resources at www.startsatthesource.com Properly connecting your Bernard® Clean Air E™ Fume Extraction MIG Gun to a fume extraction unit is key to maximizing performance and maintaining a cleaner work environment. In this video, we walk you through the simple steps to ensure a secure and efficient connection, helping you get the most out of your fume extraction system. Instructions Thread hose onto the fume port of the fume extraction unit and tighten securely. Attach the opposite end of hose to the 1-3/4” port on the Y Connector, ensuring all connections are tight. Find more resources at www.startsatthesource.com Maintaining your Bernard® Clean Air E™ Fume Extraction MIG Gun is quick and easy! Watch as we walk through the simple process of replacing the neck and trigger, ensuring your gun stays in top working condition. Designed for durability and performance, the Clean Air E™ makes maintenance hassle-free so you can focus on the job. Instructions Changing the Inner Neck Assembly Remove the Shroud and Consumables: Unthread the knurled smoke shroud from the smoke tube assembly and remove the front end consumables. Separate the Handle Halves: Remove the socket head cap screws (7/64″ hex) and keep them for later. Remove the Smoke Tube Assembly: Slide it forward and off the inner neck assembly. Loosen the Lock Nut: Place the neck in a vise (don’t over-tighten). Use 3/4” wrenches to loosen the lock nut on the neck. Unthread the Neck: Once the lock nut is loose, unthread the neck from the end fitting by hand. Replace the Neck: Add the lock nut to the new neck, thread it into the cable end fitting, and tighten by hand. Secure the neck in a vise and torque the lock nut/end fitting connection to 30 ft-lbs (40.7 Nm). Reassemble the Handle: Position the neck and smoke tube assembly into the handle. Ensure the trigger components and vacuum slide are correctly placed, with trigger wires routed properly. Secure the Handle Halves: Use the handle screws and torque them to 10 in-lbs (1.1 Nm). Changing the Switch – Button Model Separate the Handle Halves: Remove the screws completely. Remove the Terminals: Use needle nose pliers to remove the terminals from the trigger switch. Attach the New Trigger: Secure the terminals to the new trigger, position it in the right handle half, and ensure the wires are routed correctly. Reassemble the Handle: Reinstall the second handle half, tighten all screws, and torque to 10 in-lbs (1.1 Nm). Changing the Switch – Lever Model Separate the Handle Halves: Remove the screws completely. Remove the Switch Assembly: Use needle nose pliers to disconnect the terminals and carefully remove the lever. Attach the New Switch: Secure the terminals to the new switch assembly, install it into the mounting cavity, and reinstall the lever. Reassemble the Handle: Ensure all components are correctly positioned, then reinstall the second handle half, starting with the lever screw. Tighten all screws and torque to 10 in-lbs (1.1 Nm). Changing the Vacuum Slide Switch Separate the Handle Halves: Remove the screws completely. Remove the Slide Switch: Carefully take it out of the channel in the handle half. Install the New Slide Switch: Position it in the channel, ensuring it moves freely. Reassemble the Handle: Keep the slide switch properly aligned and reinstall the screws, tightening them evenly and torquing to 10 in-lbs (1.1 Nm) Find more resources at www.startsatthesource.com We designed the Bernard® Clean Air E™ Fume Extraction Gun with interchangeable shrouds, giving you the flexibility to optimize fume capture for your specific welding application. Choose from a longer shroud for maximum fume extraction, a medium shroud for the perfect balance of weld access and fume capture, or a short shroud for maximum weld access while still extracting fumes. Instructions Simply unthread the fume shroud from the neck tube and rethread your desired shroud based on your nozzle size and welding application. Find more resources at www.startsatthesource.comThe New Clean Air E™ Fume Extraction MIG Gun Offers Superior Fume Capture, Enhanced Ergonomics
The New Clean Air E™ Fume Extraction MIG Gun Offers Superior Fume Capture, Enhanced Ergonomics
Up to 95% fume capture efficiency and optimized design make workspaces safer and reduce welder strain

Product Guide: Clean Air E™ – Changing the Y Connector
Product Guide: Clean Air E™ – Changing the Y Connector
Product Guide: Clean Air E™ – Connecting to a Fume Extraction Unit
Product Guide: Clean Air E™ – Connecting to a Fume Extraction Unit
Product Guide: Clean Air E™ – Replacing the Neck and Trigger
Product Guide: Clean Air E™ – Replacing the Neck and Trigger
Product Guide: Clean Air E™ – Changing Shrouds to Maximize Fume Extraction
Product Guide: Clean Air E™ – Changing Shrouds to Maximize Fume Extraction
![]()